Ring ring

Hello!

My Name is Stephen. I live and study in New York. Also i like to make some photographs and music.

Step One:
Place the Top Row Corners

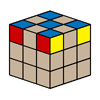
Since we have solved the first corner of our top row when we primed it, we are now ready to solve the other three. To do so, you must turn the entire cube (not any rows, columns or faces) to the left so that your original corner cubie is now the upper-left-hand corner on the front of the cube. In our example, you can see that the upper-left-hand corner is now the original blue-red-white corner with the blue and red facelets showing on the graphic (since we turned the entire cube to the left). We now need to solve the upper-right-hand corner again, so we must figure out which corner to put there. In fact, this is quite easy. Since the mystery cubie must have blue on it (otherwise it won't match the rest of the top color), and it must also have red on it (or it won't make a full-red side with the first red facelet there), we simply must find the other corner on the cube with blue and red on it. On our cube, this would be the Blue-Red-Yellow cubie.

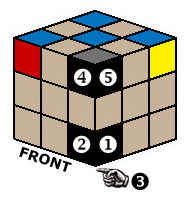
The next step is to maneuver this target cubie to the bottom-right-hand corner of the cube (shown here in black to help demonstrate the target location). The blue, red and yellow facelets on this cubie can be in any order and on any side as long as the cubie is in its proper spot. Simply turn the bottom row around (without disturbing the top row) until your target cubie is in its place. Once the cubie is at the bottom-right-hand corner on the front, depending on the location of the top color (Blue) we will choose one of the following algorithms to move it up to the top-right-hand corner and flip it around to line it up properly.


For example, if our Blue-Red-Yellow cubie happens to have the blue facelet showing on the right side of the cube (position 1) we would use the first algorithm. If instead it was on the front side (position 2) we would use the second algorithm. Finally, if the Blue facelet is on the bottom of the cubie (position 3, indicated by the hand pointing to the bottom) you would use the third algorithm.

It may also happen that the target Blue-Red-Yellow Cubie is already in its proper top-row position but it is not facing the right way (the red facelet is not on the same side as the original red facelet). If the Blue facelet is on the front (position 4) use the fourth algorithm, and of course if it is on the right side of the cubie (position 5) use the fifth algorithm. If your desired cubie is trapped in the middle layer, simply skip to another corner and once you solve it the target cubie will have been forced back into the top or bottom row. When you are finished with the corners, your cube will have a Blue "X" on the top with all of the corner colors matching up horizontally with their partners.
Step Two:
Place the Edges and Finish the Top Layer

Now that we know the general ideas on how to find the proper target cubie and then move it into position, we're ready to finish the top layer. Keeping the above concepts in mind, we must now find the target edge cubies (those that will complete the top row) and move them into the new target positions, again colored black here. Simply turn the bottom and middle layers until the target cubie is in one of these spots, and based on which side the top color (blue) is on, select from the following algorithms to move it into its place. When you are finished with step two, the entire top layer of the cube is solved.


Step Three:
Align the Centers and Place the Middle Layer Edges

To begin step 3, you must first turn the middle layer around so that the center cubies in the middle layer all match with their top layer counterparts. In our example, you can see that the red center and yellow center match up with their respective colors above them. This is known as forming the Half-T. Once you have the centers aligned, you've already partially solved the middle layer. The only thing left to do is place the remaining edges.

Now, turning only the bottom row, we will position the target cubie so that it will match up with its same-color center forming the Full-T. In our example, we have turned the bottom row around so that we have formed a Full Red T on the front of the cube. We may be ready to place this cube into position, but we must first check to make sure it is indeed the correct edge. On our cube, we would need the bottom of the Red T cubie to be either Yellow (which when moved to the right would match up with the Red and Yellow centers) or the Red-White cubie (which on our cube could be moved left, matching up with the Red and White centers). If this edge cannot connect either of the two centers to the left or right, or it is upside down (there is not a T formed, the Red facelet is improperly on the bottom) you must move on to another T formation. There will almost always be another T immediately possible. Here are the algorithms you'll use to move the target cubie to the left or right as needed:

Left Right

If you find that no T is possible, or that the correct edge is in the proper position but is turned around so that the colors do not match up, simply place a random cubie into its place by performing either of the algorithms once, which will force the proper cubie back to the bottom. Occasionally, you will have to do this several times to get the positioning correct. When you have finished, your cube will have both the top and middle layers fully solved.

Step Four:
Turn the Cube Over and Arrange the Last Layer Corners

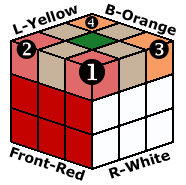
Now you'll turn the entire cube upside down (the Blue top now becomes the bottom) and arrange the last unfinished layer (Green) corners into their correct positions, although not yet finished. On our cube, the front face is the red side. So the correct corners for the front (labeled as 1 and 2) must both have Green and Red facelets on them so they'll match up with the bottom two layers we've already solved and also the Green top. Using this logic, the back side of our cube is Orange so the back corners (labeled as 3 and 4) must both then contain Green and Orange facelets. Furthermore, all the final corners must also be on their correct sides. For example, on our cube the Green-Red-White corner must be in position 1 and the Green-Red-Yellow corner must be in position 2. Once we are ready to finish them in the next step they must be ready to match up with all three colors.

Remember, we aren't trying to completely solve these final corners yet, just moving them into place to be finished in the next step. As an example, on the mini-cube to the right you can see that the Green-Red-White corner is in the correct position but not yet finished (the green facelet is on the front, the white facelet is on the top etc). The Green-Orange-White cubie on the back right side is also in the correct position, but obviously not matching up correctly yet (the orange facelet is on the white side). However, that's all you have to do for this step! We'll be flipping all of these corners around to finish them in Step Five. Here are the maneuvers used to arrange the corners into their correct positions, although not yet solved:

Switch 1 and 2
Switch 1 and 3

Many times you can take a look around the unfinished top layer and find the two Red corners already side-by-side. If that's the case, just turn the top layer around so that both Red corners are on the Red front (without disturbing the two finished layers below of course). Then you'll just have to use the "Switch One and Two" maneuver to move them back and forth to the proper sides. Concerning the Orange corners, you must turn the entire cube around (not moving any rows or columns) so that the Orange side is now the front. Then you can perform the switching maneuvers as needed. If two Reds are diagonal from one another (the red corners are currently at positions 2 and 3), perform the "Switch One and Three" maneuver to bring them side-by-side. When you have finished this step, your cube will have the corners arranged to their proper positions, but probably not yet finished.

Step Five:
Completely Finish the Last Layer Corners

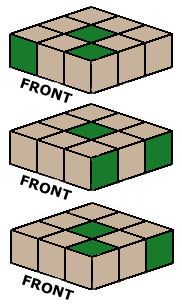
In this step, we will flip all of the last layer corners around into their final finished positions. On our cube, Green is the last layer color. To solve the corners, we will focus on three different configurations concerning the Green facelets. Using the graphic to the left, hold your cube so that when you are looking at the front you can see any of these Green facelet configurations exactly as shown. For this step, none of the other remaining facelets (or the rest of the cube) matter so they are not shown, including any other Green facelets on the last layer. Once you've located one of the three arrangements, perform the following algorithm:

Several times

Remember that while two of the configurations (the middle and bottom) require the green facelets be located on the right side of the cube, it's still necessary to perform the algorithm above from the front. You'll have to perform this algorithm several times, and you'll need to use at least two of the three different configurations to continue (finding the same configuration over and over again will just get you stuck). If you couldn't find one of the starting configurations to begin this step, perform the algorithm once and then you'll be able to find one of them.

Step Six:
Completely Finish Two Edges and Prepare the Remaining Two

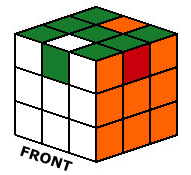
You should now find that you have also placed at least one of the remaining last layer edges into its final position, although not necessarily turned around correctly. Turn the entire cube around so that the side with a correctly positioned edge is now the front (in some cases, you'll have a couple to choose from). In our diagram, the side with the Green-White edge is the front because the edge is in its proper place (just needing to be flipped over). Then perform the following repositioning algorithm to move the rest of the edges into their proper places (up to two times). If you couldn't find a correctly positioned edge to start with, perform the algorithm once from any front and then proceed as usual.

From the Correctly-Positioned Edge Side

Step Seven:
Solve the Rubik's Cube

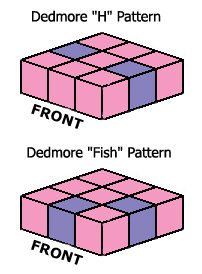
We are now ready to completely solve the Rubik's cube. At this point, only the last unfinished layer concerns us so the rest of the cube is not shown. In almost all cases, there will be two edges completely solved after finishing step six above, and two edges unsolved. The two unsolved edges, however, are now properly positioned on their correct sides and simply need to be turned around to be finished. Turn the entire cube around until the last two unsolved edges match up to either of the graphics shown to the left when looking at the front of the cube. In our graphic, the completely solved cubies of the last layer are shown in Pink, and the two unsolved edges are shown in Purple.

Once you are ready, perform the applicable last layer algorithm below to completely solve the cube. The first is known as the "H" Pattern, and the second is known as the "Fish Pattern". If for some reason you had all four edges flipped (instead of the usual two edges) when you finished step six, simply perform the "H" Pattern once from any front. You will then be able to find either of the two original patterns at that point. Congratulations! You've solved the Rubiks Cube!

Dedmore H
Dedmore Fish

***